How to Prevent Memory Bloat in Mongo

Going big with MongoDB

Feed Mongo!!

Several months ago at Yipit, we decided to cross the NoSQL rubicon and port a large portion of our data storage from MySQL over to MongoDB.  

One of the main drivers behind our move to Mongo was the composition of our data (namely, our recommendation engine system) which consists of loosely structured, denormalized objects best represented as a JSON-style documents. Here’s an example of a typical recommendation object.

How Key Expansion Cause Memory Bloat

Because any given recommendation can have a number of arbitrary nested attributes, Mongo’s “schemaless” style is much preferred to the fixed schema approach imposed by a relational database. 

The downside here, though, is that this structure produces extreme data duplication.  Whereas a MySQL column is stored only once for a given table, an equivalent JSON attribute is repeated for each document in a collection.

Why Memory Management in Mongo is Crucial

When your data set is sufficiently small, this redundancy is usually acceptable; however, once you begin to scale up, it becomes less palatable. At Yipit, an average key size of 100 Bytes per document, spread over roughly 65 million documents, adds somewhere between 7GB-10GB of data (factoring in indexes) without providing much value at all.

Mongo is so awesome, on good days, because it maps data files to memory.  Memory based reads and writes are super fast.  On the other hand, Mongo is absolutely not awesome once your working data set surpasses the memory capacity of the underlying box. At that point, painful page faults and locking issues ensue. Worse yet, if your indexes begin grow too large to remain in memory, you are in trouble (seriously, don’t let that happen).

Quick Tips on Memory Management

You can get around this memory problem in a number of ways.  Here’s a non-exhaustive list of options:

  • Add higher memory machines or more shards if cash is not a major constraint (I would recommend the latter to minimize the scourge of write locks).

  • Actively utilize the “_id” key, instead of always storing the default ObjectID.

  • Use namespacing tricks for your collections. In other words, create separate collections for recommendations in different cities, rather than storing a city key within each collection document.

  • Embed documents rather than linking them implicitly in your code.

  • Store the right data types for your values (i.e. integers are more space efficient than strings)

  • Get creative about non-duplicative indexing on compound keys.

The Key Compression Approach

After you’ve checked off those options, you may still wish to cut down on stored key length. The easiest path here probably involves creating a translation table in your filesystem that compresses keys on the way to Mongo from your code and then decompresses during the return trip. 

For simplicity sake, a developer could hardcode the translations, updating the table on schema changes.  While that works, it would be nice if there were a Mongo ORM for Python that just handled it for us automatically.  It just so happens that MongoEngine is a useful, Django style ORM on top of the PyMongo driver.  Sadly, it does not handle key compression.

Automatic Compression Tool

As a weekend project, I thought that it would be cool to add this functionality. Here’s an initial crack at it (warning: it may not be production ready).

The docstrings and inline comments are fairly extensive, but I should repeat a couple of main points:

  • This logic adds some overhead to the process of defining a class.  This happens only once, when the class is loaded, and quick benchmarking seems to suggest that it’s not overly prohibitive.  That being said, I mention several ways of improving the efficiency of this code.  First, you could move it directly into the TopLevelDocumentMetaclass or you could process the attrs before instantiating the class. Both would avoid the double work incurred here.

  • Embedded fields are not handled completely in this code.  The first time you set an embedded document, the underlying fields will be compressed.  However, if you change the nested fields subsequently but do not change the parent field, the nested fields will not be reset.  This means that you’ll have an uncompressed key for each nested field that you change.  You can get around this by dropping the mapped collection and recreating it (simple operation).  I plan to handle this logic in the code shortly.

  • Indexing in the meta attribute of the class should work as expected, though I would generally suggest that you set indexes administratively as a best practice.

The Final Mapped Output

Here is a working example of the code (you’ll need to add an abstract class to make this work).

When you define the TrialDocument Class, this document will be created in a collection titled, “trial_document_mapping”.

If you were to then remove the judge field from the TrialDocument and add a reporter field, you’d get the following:

If you were to then go into the shell, you could interact with MongoEngine like this:

Success! We’ve got compressed keys. Just one thing before we go. Beyond key space optimization, this is also a quick primer for smart value storage. Never use long string field values like this if you can help it (we can definitely help it here by using integers).

Next Steps Ahead

Hope that’s interesting and (even better) useful. I’ll try to update this post once I’ve worked out all the kinks with embedded objects and sped up the class instantiation process.

Ben Plesser is a Developer at Yipit.

@Bjpless

One of the Biggest Mistakes Django Developers Make When Using Lettuce

This post is the first in a series of posts about best practices when using Lettuce, a testing framework for Django.

When I first released Lettuce, a framework for writting automated tests in Django with user stories, I had no idea that it would have become so widely used. It’s been truly amazing to have seen it expand from Brazil to the United States to China and many other countries. It’s even been translated into 15 languages.

However, over the last 6 months, I’ve observed a common usage that, for the reasons below, developers should avoid.

Steps from Step Definition

Like Cucumber, Lettuce supports calling other steps from a step definition. This can be a very handy functionality, but can easily become a source of code that is hard to maintain.

So why is this functionality available? Although Lettuce is a testing tool, step.behave_as was a patch) that was incorporated in the codebase without complete test coverage. step.behave_as causes a step to call many others by parsing the text and calling them synchronously and sequentially.

Some people like to use this functionality in order to make their scenario look leaner, which is fine. The actual problem is that this workflow is sub-optimal, so I would advise using this functionality with caution.

An example of step.behave_as usage (please avoid doing the same) As an example, let’s consider the following feature and its respective step definitions:

defined as:

So… it looks kinda nice, why is it bad?

  1. step.behave_as implementation has issues.

  2. if you have to bypass parameters to the target steps, you will need to concatenate or interpolate strings, which will easily become a mess.

  3. if the string you pass as a parameter has typos, it’s a pain to debug.

  4. internally in Lettuce’s codebase, every single step is built from an object which is bound to the parent scenario, and metadata such as where it is defined. The current step.behave_as implementation doesn’t remount those aspects properly, leading to craziness when debugging.

  5. once you hardcode strings in your step definitions, your test’s codebase will get hard to scale to more developers, and thus, hard to maintain.

This is how Lettuce works if you are not using step.behave_as:

Please note the two aditional steps when you use it:

The solution: refactor generic step definitions into @world.absorb methods

Lettuce provides @world.absorb, a handy decorator, for storing useful and generic functions in a global test scope. The @world.absorb decorator literally absorbs the decorated function into the world helper and can be used right away in any other python files.

This decorator was created precisely for leveraging the refactoring of step definitions and terrain helpers by not requiring the developer to make too many imports from different paths, as well as to avoid making relative imports. Let’s see how the first example would look like when using @world.absorb.

The step definition def i_log_in_as now calls helpers that are available in the world helper.

Conclusion

You can easily notice that in the example above, **@world.absorb** allows for better maintainability and cleaner step definitions.

  1. Hardcoded strings would require manual updates when any related step-definitions has its regex changed.

  2. Step definitions that are multiple-lines long now just bypass the parameters into single-line function calls.

  3. When the hardcoded string has typos, no syntax error will occur yet the test will fail with a misleading error message.

Gabriel Falcao is a developer at Yipit and the creator of Lettuce. You can follow him on twitter and github.

Auto-Detecting Anomalies in Your Key Metrics

As your web application grows, so does the importance of monitoring. With more cogs in the machine, more things can go wrong. At Yipit, we want to find and fix application level errors in a timely fashion.

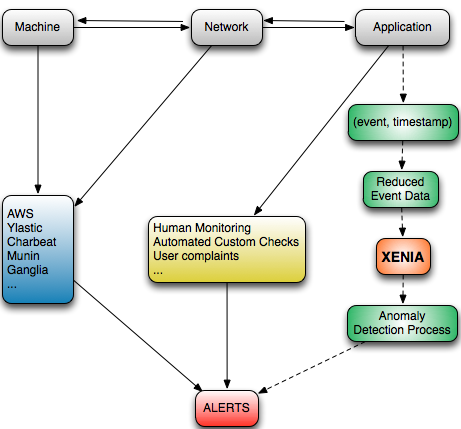
While our test suite catches most bugs, some inevitably seep through. Whereas many tools such as Ylastic, AWS, Chartbeat, Munin, and Ganglia help mitigate the monitoring headache on the machine and network level, they don’t do as great a job at the application level.

Monitoring of Application Level Metrics at Yipit

At Yipit, our application metrics consist mostly of user actions, or events. We log everything from opening our daily email and browsing the web interface to making an API call and using our mobile app.

Up until now, we’ve relied on human monitoring, user complaints, and automated custom scripts to detect worrisome trends in our application metrics. However, our recent growth forced us to look into more scalable solutions to this problem. As such, we have begun developing an automated anomaly detection system for monitoring application level metrics more intelligently, code-named Xenia.

Xenia (Not the Warrior Princess)

The main purpose of Xenia is to alert us as soon as some event metric starts to behave abnormally, as this could be indicative of an error. On the flip side, if some metric like sign-ups is doing much better than normal, we can relate it to an exogenous event such as a favorable newspaper article. As such, Xenia is useful not only for diagnosing errors, but also for understanding what you are doing right.

Anomaly Detection as a Classification Problem

To express our problem formulation in more theoretical terms, consider a classification problem where some time series data is either normal or abnormal. All Xenia is doing is classifying incoming data into one of these two cases. Naturally, the definition of normal is key here.

At Yipit, we approached this by leveraging historical data and applying statistical analysis.

A baseline process is performed on normal historical data, aggregated over several periods. In sampling a fresh period, Xenia looks at how much the fresh data differs from the baseline data.

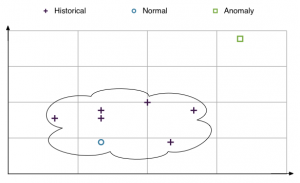
Pictorially, you can think of the historical data as dots in some vector space. Xenia draws a tolerance boundary around it, and determines whether fresh data points fall within that boundary or not. Note that this is different from clustering - clustering means grouping objects into different classes whereas classification means determining which class a new object belongs to.

Comparison Methodology

In comparing the data, we do not use frequencies (e.g. number of API calls per minute), but rather slopes (e.g. the increase of API calls since the last minute). By using slopes instead of raw values, we avoid anomaly detection based on mere growth. Instead, anomalies are defined as radical changes in the slope profile of a certain metric.

Since slopes can take on any value, we bucket slopes into power buckets. This means that any slope x, where 2i <= x < 2i+1, would fall into bucket i. This way, buckets are less granular at extreme slopes, to help accommodate a huge range of slopes into a finite number of buckets. The number of times each bucket is hit is used to profile a metric.

Detecting Anomaly

Now, there are many ways in which the slope profile of a certain metric can differ from its historical profile. It can hit previously empty buckets, hit a certain bucket a different number of times, result in different values when performing statistical tests, etc. To give you a concrete example of a statistical test we use, take the Mann-Whitney U Test, which yields a test statistic indicative of how likely two samples (the historical and the fresh data) are to come from the same probability distribution.

Each way in which fresh data differs from its historical profile constitutes an alert reason, and is assigned a score based on its type, magnitude, and weight. An anomaly is detected when the sum of these scores exceed a dynamic threshold determined by machine learning.

Breaking Down an Anomaly

These alert reasons allow us to understand the main contributing factors that triggered the alert, which Xenia could use to tweak parameters dynamically.

Furthermore, this breakdown allows for additive development in the sense that we can add new alert reasons as we come up them without replacing old ones. With machine learning, alert reasons can also be toggled and assigned different base weights based on their effectiveness.

Visualizing Anomaly

Whenever an anomaly is detected, Xenia displays relevant statistics and information, as well as graphs to visualize the data (using Graphite). Such an alert view also has a feedback capability, where humans, after looking into the issue, can mark the alert instance as true or false. This way, Xenia constantly learns and improves, and reacts dynamically to different types of metrics over time.

A Work in Progress

While we believe in its potential, our current methodology relies on some assumptions and has weaknesses:

  • Assumes independence of sequential slopes

  • Disregards order of slopes

  • Doesn’t take into account relationships between metrics

  • Calibration takes time

  • Impacted by seasonal factors (like holidays) unless historical data spans more than a year

But we see Xenia as an evolving project. Soon, we hope it will be good enough to serve Yipit’s needs. We’ll be sharing our progress, mistakes and lessons learned as we continue to work on this project.

Meanwhile, we would really appreciate suggestions and feedback. You can comment below or reach out to Henry Xie, the author of this project, at henry at yipit dot com.

Eventually, we hope it could become generic and good enough to constitute an important tool for any large web application.

How to Add Django Database Caching in 5 Minutes

Ca-Ching

Milk my Caching for all it’s worth

One of our big challenges at Yipit as an aggregator has been weaning ourselves off of all of those dastardly MySQL Joins.  As Uncle Ben once warned Peter Parker, “With great power comes interminably long queries”.

Fortunately, because our workload skews heavily towards reads, we’ve had success implementing various caching  strategies across the stack.  On the application level, we’ve leveraged Django’s built-in caching framework to enable site-wide caching for anonymous users, view level caching for authenticated pages (especially useful for our API), and ad-hoc caching for aggregate queries.

Lately, we’ve begun to dive more deeply into the holy grail of Django data retrieval: cached QuerySets.  Conveniently, there are a number of quality libraries available to facilitate this sort of thing, including Johnny Cache, Django Cache-Bot, and Django Cache Machine.  We’ve decided to go with Cache Machine for the foreseeable future thanks to its dead simple integration, its common sensical handling of invalidation (including through Foreign Key relationships), useful ancillary features such as caching RawQuerySets and QuerySet counts, and its easy extensibility.

A Quick Recap of How Cache Machine Works

Cache Machine stores full model QuerySets as key value pairs in one of three backends: Memcached, Locmem, or Redis.  The key here is generated by hashing the underlying raw MySQL for a given query, while the value is yielded by iterating through the entire QuerySet and extracting field values for each object.  On a storage level, Cache Machine extends the built-in Django caching backend to enable infinite cache timeouts.  While generally an awesome feature, this makes intelligent invalidation critical.

To ensure that cached QuerySets represent (mostly) consistent views of the underlying model data, Cache Machine ties each cache key to a flush list of associated objects, including Foreign Key relations.  For any given object, post-save and post-delete Django signals (hooked in through the Manager class) are responsible for invalidating all related cache keys via their respective flush lists.

Setting up Cache Machine in your Django Project

Adding Cache Machine to your app is ridiculously easy.   Just subclass a Mixin in your model definition and set the default manager to the library’s CachingManager.

Yep, it’s that wonderfully simple.  Under the hood, the CachingManager returns a custom QuerySet (CachingQuerySet) which wraps the caching functionality around the core Django Queryset.  It does so by overriding the iterator() method.

Rather than simply iterating through the QuerySet, the CachingQuerySet iterator method instantiates a generator function (via the CacheMachine class) and then iterates through this function, either yielding objects from the cache or, alternatively, getting objects from the SQL cursor and then setting them in the cache once the iterable is completely exhausted and StopIteration is raised.

For best performance, the library recommends that the CachingManager is set as the default model manager.  This enables caching for related models (i.e. CacheIt.objects.all()[0].related_stuff).  However, if you so choose, you can add a non-default manager so long as its get_query_set() method returns a CachingQuerySet object.  All things being equal, it’s obviously desirable to allow for caching FK objects.

Extending Cache Machine for Yipit

We love that Cache Machine just works right out the box.  There are, however, a couple of major issues that we had to account for prior to pushing this library live.  Our biggest concern was that cache invalidation only applies to objects already present in the original QuerySet. Saving or deleting old instances will invalidate a given query key; however, creating a new model instance will not force this action. Calling update() on QuerySets also fail to invalidate the appropriate cache key.

This was an intentional choice by the library author and, in many cases, it promotes acceptable behavior.  The idea here is that data will, for the most part, become eventually consistent through either active model saving or through culling of data on the storage level as cache memory becomes saturated.

In certain cases, though, this sort of behavior is less palatable.  At Yipit, our data has variable time sensitivity and expense of retrieval.  We wanted the flexibility to pick and choose which models to cache (as well as the duration for each). With that in mind, we decided to stick to the theme of a single default manager which returns a custom QuerySet. The big difference is that QuerySet class only conditionally hits the cache.  Our code looks like the following:

The CachedQuerySet class overrides the CachingQuerySet iterator method to add a flag (“from_cache”) to determine whether the given query should hit the cache.  This flag depends on the private QuerySet attribute, retrieve_from_cache, which is first set in init() magic method and later potentially overridden in the from_cache() method.  Finally, it is copied in the clone() private method (clone is called in the iteration process so you’ll need to set the attribute here as well).

Hitting the cache can be set as the default behavior for a given QuerySet by setting the  “default_from_cache” keyword argument to True when initializing the Queryset.  This initialization occurs in the get_query_set() method of the CachedManager. You may also set the default timeout for the QuerySet in this method, which is something that we have also taken advantage of on a per model basis.

At the end of the day, we can decide whether we want all QuerySet methods cached for a particular model within a single line:

Alternatively, we could have created a separate manager here for caching; however, handling it in the QuerySet propagates the caching more quickly throughout the existing code base and, more importantly, offers the nice advantage of chaining.  By setting the getattr() magic method in the CachedManager, you can effectively handle all your lazy chaining needs (see this post by Zach Smith on this awesome Django tip).

Remember to Select_Related

The big downside to this method is that QuerySets with non-caching defaults will not allow for FK object caching.  To get around this issue, make sure to explicitly call the select_related() QuerySet for models with FK relationships which you wish to traverse.  Django will force potentially evil (time wise) Joins here to collect the related data.  Fortunately, you’ll be able to cache this result set for lightning fast future access.

Future Plans for QuerySet Caching

While we think that this is a good start for our internal QuerySet caching needs, there’s still a lot for us to do.  Rather than conditionally caching certain queries and models, we plan to explore invalidation techniques for updated and newly created object instances. We hope you’ll tune in for those future updates!

Hacker News Discussion

Ben Plesser is a Developer at Yipit.
Getting to Continuous Deployment in Django: Feature Flipping

This post is a first in a series of posts about our move towards continuous deployment using Django.

Continuous deployment is a process by which code that is written for an application is constantly deployed into production without manual intervention. This allows us to be agile, to quickly innovate, and more importantly, to bounce back from any grave errors, unscathed.

When it comes to building new features, this can involve merging feature branches, rigorous code review, testing, and deployments, before you can test it out on a live environment. Every subsequent release to different groups of users would require code changes, and deployment.

This can be avoided by employing feature flipping, which is an essential step towards achieving continuous deployment in your application.

So what is this feature flipping thing, anyway?

In its most basic form, you can think of it as applying an on/off switch to a piece of code in your codebase thereby releasing or rolling back a feature.

This allows you to constantly push new code for features that you’re not quite ready to release to any of your users yet. And when you’re ready, you can do a gradual rollout of the feature - to various groups of users. All, from a simple dashboard, with a single click.

Analysis of Django Feature Flipping Libraries

There are a number of open source libraries in Django that can be used for this purpose. Recently, we analyzed our various options - the two biggest contenders were Gargoyle and Django Waffle. Following is the result of our evaluation:

Ease of Installation:

Both libraries can be installed via pip or easy install and have to be included in your list of INSTALLED_APPS. Waffle also requires you to add a MIDDLEWARE and a CONTEXT_PROCESSOR for templates.

Switches and Flags:

Both libraries support applying a switch to a piece of code via a conditional, a decorator to a view or template tags in Django.

Gargoyle, however, allows you to set conditions to your switches such as percentage of users, groups or specific users. It also allows us to associate percentages with users IP address - release it to 30% of NY, 10% of chicago etc.

Waffle takes a different approach to this and uses Flags, which when activated can be applied to groups, specific users, or a set percentage of users. Although flags can be triggered in every way that a switch can be, they are tied to request objects while switches are named booleans in the database. The flipping uses cookies and is session based so ‘smart’ users can get around it but this can be avoided by adding a user to a group when they initially encounter the feature, and enabling the feature for that group.

Usage in Javascript:

Waffle allows us to use switches and flags in javascript by including the appropriate JS file and using the global waffle object.

if (waffle.flag('some_flag')) {
   // Flag is active.
} else {
   // Flag is inactive.
}`
`
if (waffle.switch('some_switch')) {
   // Switch is active.
} else {
   // Switch is inactive.
}

Gargoyle does not currently support Javascript.

Admin Frontend:

Although not necessary, Gargoyle encourages the use of Nexus for the Django Admin frontend. If you choose not to do this however, you will need to enable the discovery of gargoyle.py modules in your urls.py.

import gargoyle
gargoyle.autodiscover()`

Final Thoughts

As mentioned earlier, both libraries are strong contenders in the Django Feature Flipping community and can be easily forked on Github to add extra functionality if required, instead of reinventing the wheel.

Finally, while feature flipping definitely has its upsides it can have its disadvantages. Although this means less merges, continuous integration and frequent and smaller deployments, constant maintenance of the codebase is necessary once a feature is completely released so you don’t have to maintain multiple versions.

Nitya Oberoi is a Developer at Yipit.

To find out about future posts, you can follow along using: